Create photos that pop with this exclusive Photoshop Action

In this video tutorial on Photoshop Actions, I share how to turn an otherwise ok photo into a more eye catching picture. After all, isn’t it all about capturing photos that get people’s attention?
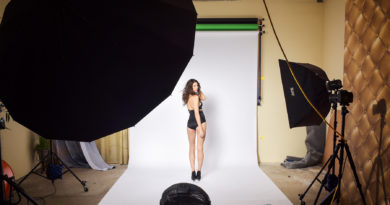
First lets look at the original picture, shown above on the left. You can see that although the background is out of focus, the main subject seems to blend with the background, not very interesting. Plus I can still make out the electrical box on the wall and parts of the wooden benches on the right. Overall this image needs some help.
Listing the various adjustments I made would not help here, since they are specific to this picture only. However, after applying it to several images with good final results, I decided to record it as a PS action. The PS action file will enable you to apply it to your images if you have any version of Photoshop CS (regular or student version). It was created on PS CS3 windows based, so I’m not sure if it will work on a Mac, but you can try it.
Here is a video showing how the PS action file worked on the unedited photo. Plus, for those not familiar with PS actions, the video shows how to load the file and use it on PS. Remember this file only works on Photoshop, it won’t work on any other photo editing program.
Photoshop Actions video tutorial
As you can see from the video, the process is very quick. The action file works like a filter, quickly editing the image.
Personally I prefer the picture after applying the edits, the background is darker and with the new tone looks like a real backdrop. The female model is now the focus, plus the added darker tones and tint adds to the overall appeal of the image.
This final result is not for everyone or all photos, the PS DRHiC action file simply sets a special mood for photo, so choose your image wisely.
Download Photoshop Action File
The PS action file which I’ve called DRHiC – OutletPhotography can be downloaded and loaded as well as tweaked to fit your needs.
The results will vary depending on your photo. Note that the actions file does not include any cropping, airbrushing or other edit, this you’ll need to do on your own. The actions file includes only the adjustments of levels to the layers and image as a whole.
As in the video, use the history tool to undo portions of the edits or double click on the actions file steps to change the settings. And always remember, never edit your original photo make a copy before any edits.